WebDAV
You can access files on your OpenDrive account through WebDAV by connecting to our server here:
Enjoy the same file permissions, access privileges and security functions that are standard with all premium OpenDrive accounts in a new, convenient way that bridges all platforms. Since the WebDAV platform is over an HTTPS secured connection, you should not use WebDAV with a VPN or proxy, as they are not needed, and may result in slower transfer speeds and connections.
Unlike most WebDAV servers, your entire file and folder structure, with their permissions already set according to the settings on your account, will be available for access from the start. You can log in, upload/download items and browse files and folders automatically with ease, the same as you would through our web interface and apps.
The WebDAV protocol also offers the option to map OpenDrive as a network drive, allowing your third party applications to see the directories your files are located in, now that OpenDrive can be accessed as a drive letter, the same as any other drive on your computer.
Due to caching, larger file uploads will require the timeout value on the client side to be set to 1900 seconds and on if using a 3rd Party WebDAV Client the max threads should be set to 4.
Windows Vista/7/8/10/11
To set up your OpenDrive WebDAV connection through Windows:
- Make sure your LAN setting are configured to allow Windows to connect to OpenDrive as a network location by verifying that the option to “automatically detect connection settings” is unchecked.
- Open Windows File Explorer and click Map Network Drive at the top of the window.
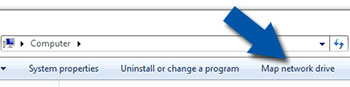
- Optional – If you don’t see that option you can right-click on “This PC” on the left side of your Windows File Explorer window.
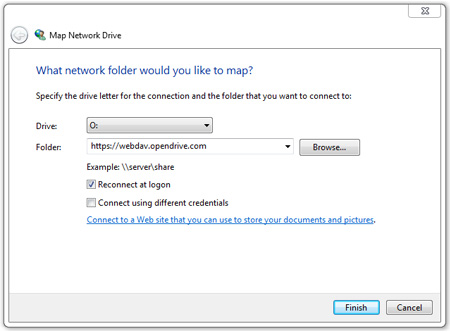
- Choose the drive letter you wish to use.
- Paste the following address into the Folder box: https://webdav.opendrive.com
- Depending on your preferences, choose whether or not to enable reconnection at login.
- Click Finish.
- When prompted, enter your OpenDrive username and password.
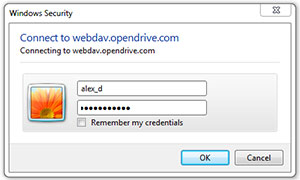
- Choose whether or not you wish to remember the password and click OK.
OpenDrive will now appear in My Computer as a mapped drive with its own drive letter.
Please note that Windows default settings will not allow file transfers via WebDAV that are larger than 4 GB, and also will timeout if a file transfer takes longer than 30 minutes. You can work around these Windows limitations following the steps in this Microsoft Technet article.
In 2024 Microsoft released an update for Office Apps that can block accessing WebDAV resources that use basic authentication (i.e. username and password). The steps to unblock that update are listed here. As this is quite technical, we have created a script you can run to make the changes automatically. You can download that script here if you don’t want to do the steps manually.
Linux
To set up an OpenDrive WebDAV connection through Ubuntu Linux:
- Install the WebDAV package by entering the following command:
apt-get install davfs2 - Enter to following command set and follow the prompts that appear:
% sudo mount -t davfs https://webdav.opendrive.com /mnt

[sudo] password for gt19:

Please enter the username to authenticate with server

https://webdav.opendrive.com or hit enter for none.

Username:

Please enter the password to authenticate user  with server

https://webdav.opendrive.com or hit enter for none.

Password:

%
OpenDrive will now be mounted in /mnt as an accessible drive.
Mac OSX
To set up an OpenDrive WebDAV connection through Mac OSX:
- In Finder, choose Go
- Choose Connect to Server
- Enter https://webdav.opendrive.com in the Server Address field
- Click Connect